
")
")
")
")
")
")

")
")


DIY homemade foundation……So I don’t know if this is a thing for anyone else—but I reached that point where my skin started breaking out every time I wore regular foundation. Like, the “I’ve been personally victimized by that $48 bottle of liquid disappointment” kinda situation. You ever just look in the mirror and your pores are screaming, “Sis, we can’t do this anymore”?
Yeah. That was me. Crying over a breakout while applying more foundation to hide the breakout that the last foundation caused. It’s the circle of cosmetic chaos.
Then I remembered a thing: I have a pantry. And Pinterest. And zero chill.
So I decided to make my own foundation. Because clearly, the universe wanted me to either become an herbalist or go fully feral. Maybe both.
The Kitchen Witch’s Guide to Homemade Foundation
Before we go full goblin mode and smear cinnamon on our cheeks (please don’t), let’s talk about what this DIY homemade foundation actually involves. I promise you—no weird goat’s milk or unicorn dust. Just normal ingredients. Stuff I already had. Stuff you probably already have too unless your fridge is entirely Hot Pockets and regret.
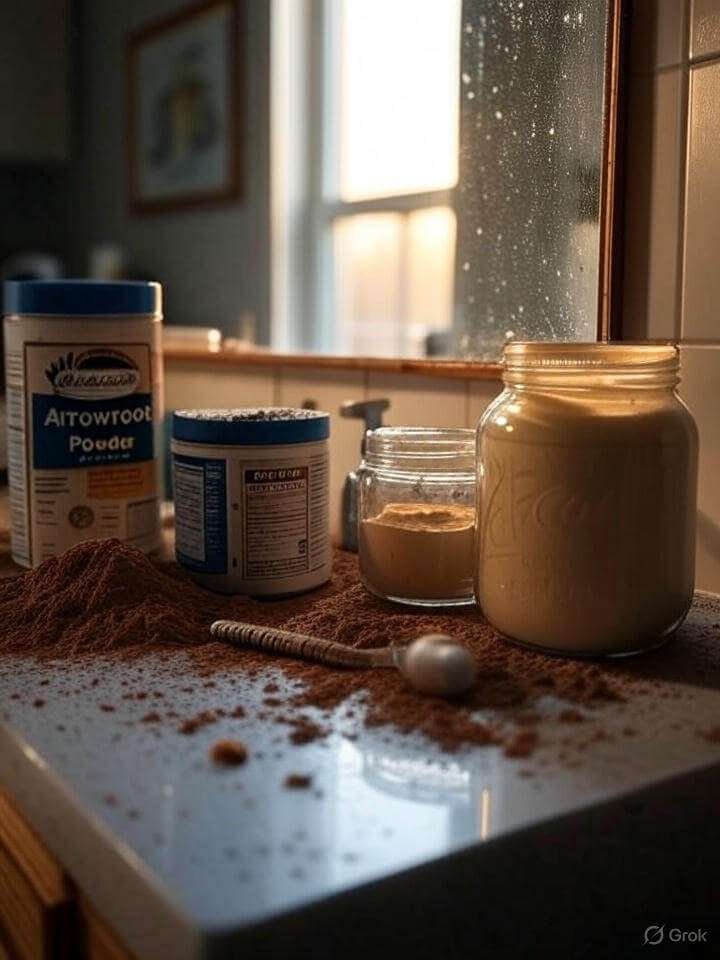
Here’s What I Used (aka my potion starter kit):
- Arrowroot powder (or cornstarch) – this is your base, gives that smooth, silky texture
- Cocoa powder – for color, plus it smells so freaking good??
- Cinnamon (optional) – adds warmth, but test it first; some people’s skin is like, “No thanks, Satan.”
- Nutmeg (also optional, also risky) – again, spice cautiously
- Bentonite clay or kaolin clay – adds some skin-lovin’ benefits and staying power
- Jojoba oil or sweet almond oil – moisturizing and helps it blend smoothly
- Shea butter or aloe vera gel – to give it more of a creamy, BB-cream texture
- A tiny container you stole from that hotel three years ago. Or a clean jar. Either works.
Mixing Chaos Into Beauty (a.k.a. How I Did It)
Okay so this is not a scientific process. This is pure chaos crafting.
But here’s my loose “recipe” if we can even call it that:
Dry Base:
- 2 tbsp arrowroot powder
- 1 tsp cocoa powder (more or less depending on your skin tone)
- ¼ tsp cinnamon and/or nutmeg (optional, use caution!)
- 1 tsp bentonite clay (optional but I love it)
Then slowly add:
- 1 tsp jojoba oil
- ½ tsp shea butter (melted)
- Mix until it’s your kind of texture. Want a powder? Stop early. Want creamy coverage? Add more shea or aloe.
Pro tip from someone who totally messed this up twice:
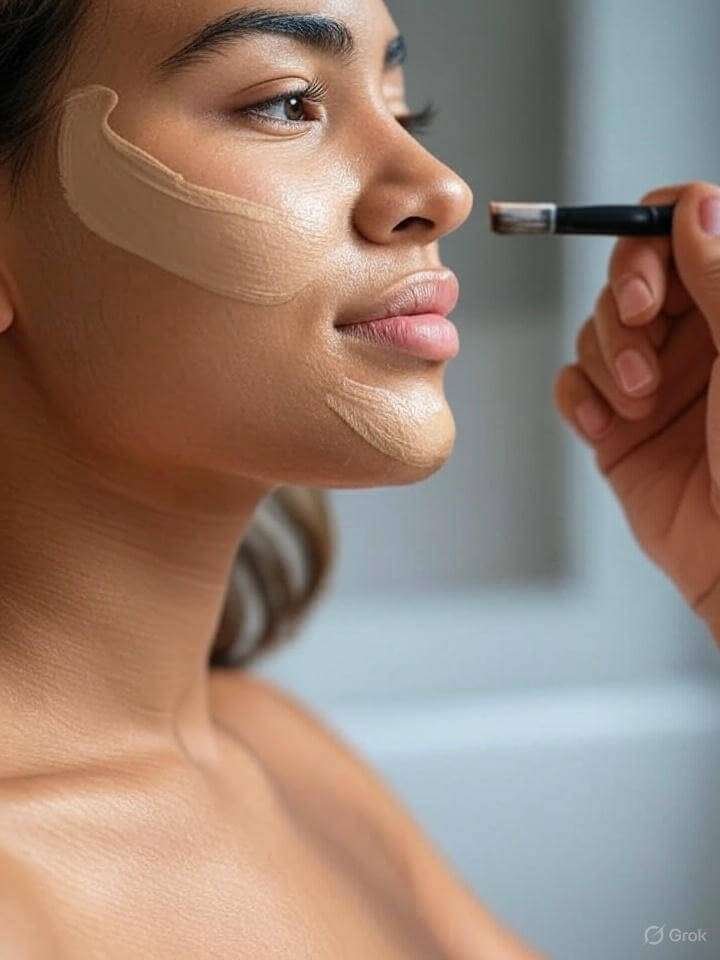
Test it in daylight.
Like, not in your bathroom under that haunted yellow bulb. Go outside, blend it on your jaw, and see if you look glowy or like you just lost a battle with a chocolate bar.
“But Does It Work??” — An Honest Rant
I’ll be real. The first time I made this, I looked like a blotchy brownie. But after adjusting the ratios (and not panicking), it actually looked kinda amazing.
Like… my skin was breathing. It was dewy, didn’t scream “I’m wearing foundation.” It whispered, “I drink water and have a therapist.”
Plus? My skin didn’t break out. Not once. My sensitive, dramatic, cries-at-commercials skin was chill with it. And that’s saying something.
The Pros and Cons (Because Life’s Not Perfect)
✅ Pros:
- Cheap af. Like, made-from-your-pantry cheap.
- Customizable. You want full coverage? Go creamy. Just want a dusting? Stick to powder.
- Non-toxic, natural, and smells like dessert.
- You get to feel like a mad scientist.
❌ Cons:
- Trial and error. You will mess up the shade the first time. And probably the second.
- Shelf life. No preservatives = make small batches.
- Not sweatproof. If you’re doing a marathon or, idk, planning to cry at a wedding, maybe keep the store-bought stuff nearby.
Stuff I Learned the Hard Way (So You Don’t Have To)
- Don’t overdo the cocoa. Seriously. It’s easy to think “darker = better coverage.” You’ll just end up looking like a bronzed donut.
- Stir like your life depends on it. Clumps are not cute.
- Do a patch test. I know, boring advice. But nobody wants cinnamon-face rash.
- Store it like your sanity depends on it. A tiny jar or compact keeps things neat. Don’t use the same jar you use for pickles. (Ask me how I know.)
Wanna Go Fancier? Here’s the Bougie Version
So if you’re extra and have time on your hands (or just love chaos), try adding:
- Beetroot powder for rosy undertones
- Turmeric (literally a tiny pinch) for golden tones
- Zinc oxide for a little SPF action (but talk to a derm first, I’m not a doctor—I’m barely a grown-up)
Bonus points if you label the jar “Unicorn Dust #3” just to mess with people.
So, Is DIY homemade foundation Worth It?

For me? 100% yes.
Is it messy? Oh, absolutely.
But there’s something satisfying about using ingredients you can pronounce. That you made yourself. It feels… empowering. Like you’re in charge of your face for once and not some random brand named after a French verb.
I mean, worst-case scenario? You end up with a powder that smells like brownies and doesn’t work—and honestly, there are worse outcomes in life. https://kohopoho.com/homemade-face-moisturizer/.
Try It. Laugh. Adjust. Repeat.
So yeah, if you’ve been searching for the perfect natural makeup recipe and want to experiment with a DIY homemade foundation that won’t make your skin cry, give this a shot.
And if it fails? You can still bake with the cocoa powder. Probably.
Wanna Read More Messy Beauty Experiments?
Check out this post on DIY lip tints gone wrong and right or this hilarious take on natural deodorant fails.
")
")
")


")